As you may all know, when it comes to film photography and cinematography, lighting is everything. However, achieving perfect lighting sometimes can be a challenge, especially for beginners. This is where a light meter comes in.
A light meter is a device that measures the intensity of light and helps photographers and cinematographers adjust their camera settings to capture the perfect exposure. In this article, we will provide a comprehensive guide on how to use a light meter for both photography and cinematography.
What is a Light Meter?
A light meter is a device that measures the intensity of light. It consists of a sensor that captures light and a display that shows the measured values. Light meters can be analog or digital. Analog light meters use a needle to display the measured values, while digital light meters display the values on an LCD screen.
Light meters can be used to measure ambient light, flash light, or both. Ambient light meters measure the natural light in a scene, while flash light meters measure the light emitted by a flash. Some light meters are capable of measuring both ambient and flash light.
Analog Light Meters vs. Digital Light Meters
Analog light meters and digital light meters both have their pros and cons. Analog light meters are often more affordable and easier to use, but they may not be as accurate as digital light meters. Digital light meters on the other hand are far more advanced and can provide more accurate readings, but they are often more expensive and may have a steeper learning curve.
How to Read a Light Meter for Film Camera
Using a light meter for film camera is relatively easy. Here is a step-by-step guide on how to read a light meter:
- Turn on the light meter and select the appropriate mode. Most light meters have a button or a dial to switch between ambient and flash modes.
- Point the sensor towards the subject you want to measure. Make sure that the sensor is facing the light source.
- Press the measure button to take a reading. The light meter will display the measured values on the screen.
- Adjust the camera settings based on the measured values. Depending on the light meter and the camera, you may need to adjust the aperture, shutter speed, or ISO.
- Take a test shot and check the exposure. If the exposure is too bright or too dark, adjust the camera settings and take another test shot.
Different Lighting Scenarios
The lighting in a scene can vary, and it is important to adjust the light meter readings accordingly. Here are some common lighting scenarios and how to adjust the readings:
- Backlighting: If the subject is backlit, the light meter may give an incorrect reading. In this case, take a reading of the light source and adjust the camera settings accordingly.
- High-contrast scenes: If the scene has a high contrast, take multiple readings of the different areas of the scene and average them.
- Mixed lighting: If the scene has different types of lighting, take a reading of each light source and adjust the camera settings accordingly.
Best Light Meters for Film Photography and Cinematography
If you’re in the market for a light meter, there are many options available, each with its own features and benefits. Here are some popular light meters that are recommended for different types of photography:
For cinematography:
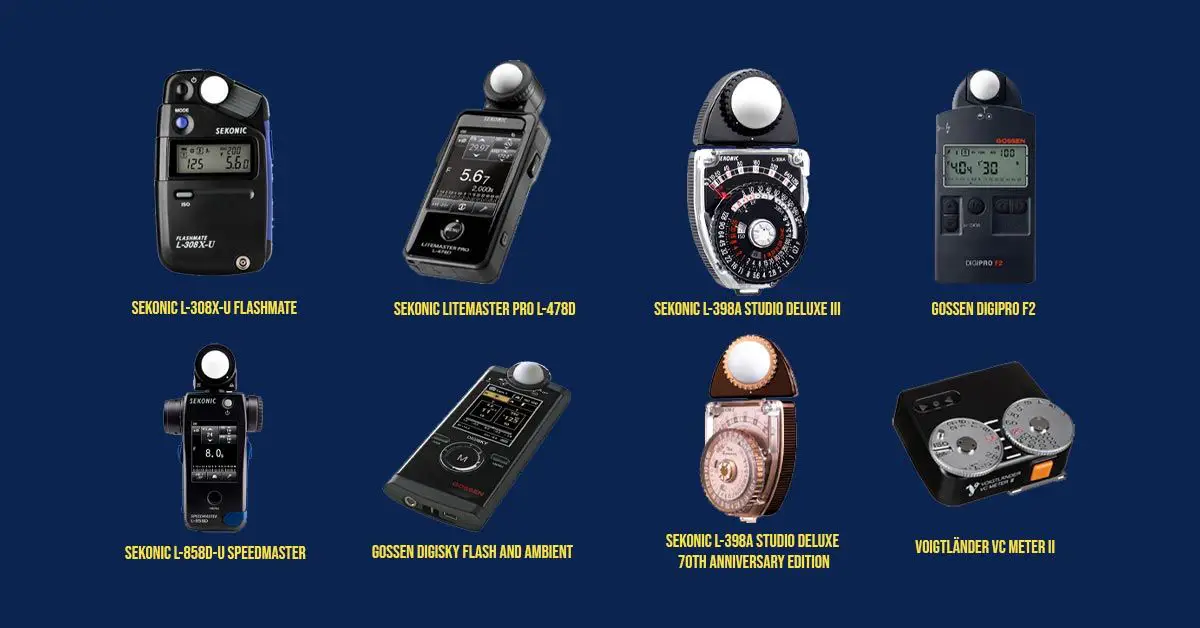
- Sekonic L-308X-U Flashmate Light Meter: This versatile handheld light meter can measure both ambient and flash lighting, and is ideal for both still and motion picture shooting. It’s lightweight and easy to use, and features a large LCD display that shows both shutter speed and aperture.
- Sekonic Litemaster Pro L-478D: This advanced light meter is specifically designed for use in cinema and video production. It can measure both incident and reflected light, and features a touch screen interface for easy operation.
For studio photography:
- Sekonic L-398A Studio Deluxe III: This classic light meter is a favorite among studio photographers. It’s an analog meter that measures incident light, and features a simple, straightforward design that’s easy to use.
- Gossen Digipro F2: This digital light meter is another popular choice for studio photography. It can measure both ambient and flash lighting, and features a large, easy-to-read LCD display.
For outdoor and location photography:
- Sekonic L-858D-U Speedmaster Light Meter: This top-of-the-line light meter is designed for use in all types of lighting conditions, including bright sunlight and low-light situations. It can measure both ambient and flash lighting, and features advanced functions such as spot metering and wireless triggering.
- Gossen Digisky Flash and Ambient Light Meter: This versatile meter is designed for use in both outdoor and indoor environments. It can measure both ambient and flash lighting, and features a built-in color temperature meter for accurate white balance.
For film photography:
- Sekonic L-398A Studio Deluxe 70th Anniversary Edition Light Meter: This special edition of the classic L-398A is perfect for film photographers. It’s an analog meter that measures incident light, and features a retro design that harkens back to the golden age of film photography.
- Voigtländer VC Meter II: This shoe-mounted light meter is specifically designed for use with film cameras. It’s compact and lightweight, and can measure both incident and reflected light.
Light Meter Apps
If you don’t want to invest in a separate light meter, there are also many light meter apps available for your smartphone or tablet. Some popular options include:
- Pocket Light Meter: This app is available for both iOS and Android devices, and provides accurate exposure readings based on your device’s camera. It can measure both incident and reflected light, and also provides useful information such as aperture and shutter speed.
- Lumu Light Meter: This app is designed to work with the Lumu light meter attachment, which plugs into your smartphone’s headphone jack. It can measure both ambient and flash lighting, and also includes a color temperature meter.
- MyLightMeter Pro: This app is available for iOS devices, and provides accurate exposure readings based on your device’s camera. It can measure both incident and reflected light, and also includes a range of advanced features such as spot metering and exposure compensation.
Pros and Cons of Light Meter Apps
Light meter apps are a convenient and affordable alternative to traditional light meters. However, they also have their pros and cons. Some of the pros of light meter apps include their convenience, affordability, and ease of use.
Some of the cons include their accuracy, which may not be as good as traditional light meters, and their reliance on the camera sensor, which may not always provide accurate readings.
Factors to Consider When Using a Light Meter
While a light meter can give you a good starting point for setting your exposure, there are a few other factors you may want to consider when fine-tuning your settings. These include:
- Reflectance: Different materials reflect light differently. For example, a black sweater will absorb more light than a white one, which means that the same exposure settings may not work equally well for both.
- Contrast range: A scene with high contrast, such as a bright sky and a dark foreground, may require different exposure settings than a scene with low contrast.
- Light temperature: The color of light can affect the way your photos look, even if they’re properly exposed. For example, indoor lights tend to be warmer and yellower than outdoor light, which can make skin tones look unnatural. Some light meters allow you to measure color temperature, which can help you adjust your white balance settings accordingly.
Using Light Meters for Lighting Design
Lighting design is an important aspect of many industries, including film, theater, architecture, and interior design. A well-designed lighting scheme can enhance the mood and atmosphere of a space, highlight key elements, and even affect our emotions and behavior. However, achieving the desired lighting effects requires careful planning and execution, and a light meter can be an invaluable tool in this process.
In this section, we will discuss how to use a light meter for lighting design, including selecting the right meter, measuring light levels, and interpreting the readings.
Selecting the Right Light Meter
When it comes to selecting a light meter for lighting design, there are a few important factors to consider.
First, consider the type of lighting you will be measuring. For example, if you will be measuring natural light, you may want a meter with a wider dynamic range and a cosine-corrected sensor. If you will be measuring artificial light, you may want a meter with a color temperature function to ensure accurate readings.
Second, consider the features you need in a meter. Some meters may have additional functions, such as memory storage, data logging, or the ability to measure flicker frequency, that may be useful for your specific needs.
Measuring Light Levels
Once you have selected the right light meter for your needs, it’s time to start measuring light levels. Here are the steps to follow:
- Set up the scene: Set up the lighting as you intend it to be for the scene or space you are designing. Make sure all the lights are on and at their desired levels.
- Position the meter: Hold the light meter in the position where you want to measure the light. This could be at the subject’s position, at the camera position, or at a specific point in the space you are designing.
- Take the reading: Press the button on the meter to take a reading. The meter will give you a value in lux, foot-candles, or another unit of measurement, depending on the meter and your settings.
- Repeat: Take readings at multiple points in the scene or space to ensure you have a comprehensive understanding of the lighting levels.
Interpreting the Readings
Once you have taken your readings, it’s time to interpret them and make adjustments to the lighting as needed. Here are some tips for interpreting your readings:
- Check for consistency: Make sure the readings are consistent across the scene or space. If there are areas with significantly higher or lower readings, you may need to adjust the lighting to achieve a more even distribution.
- Compare to desired levels: Compare the readings to the desired lighting levels for the scene or space. If the readings are significantly higher or lower than the desired levels, you may need to adjust the lighting accordingly.
- Adjust lighting: Use the readings as a guide to make adjustments to the lighting. This could include adjusting the intensity of individual lights, changing the position or angle of lights, or adding or removing lights as needed.
Using a light meter for lighting design can help you achieve the desired lighting effects for your scene or space. By selecting the right meter, measuring light levels, and interpreting the readings, you can create a well-designed lighting scheme that enhances the mood and atmosphere of your space. So, take the time to learn how to use a light meter for lighting design, and take your lighting to the next level.
Conclusion
In this article, we have covered everything you need to know about using a light meter in both photography and cinematography. We have discussed what a light meter is, how to use it, and the importance of using one to achieve accurate exposures and consistent results in your work. We have also covered some of the best light meters on the market, including digital and analog models, and how to choose the right one for your needs.
Whether you are a professional photographer or cinematographer, or just starting out, a light meter can be an invaluable tool to have in your arsenal. With a little bit of practice and experimentation, you can start using a light meter to achieve the results you’re looking for in your work.
We hope this article has been helpful in demystifying light meters and giving you the information you need to start using one in your photography and cinematography work. With the right equipment and techniques, you can take your images and videos to the next level and achieve the results you’re looking for.
Frequently Asked Questions
How to use a light meter?
A light meter is used to measure the intensity of light in a scene and helps determine the best exposure settings for your camera. To use a light meter, turn it on and hold it up to the scene you want to photograph. The meter will measure the light and display the recommended aperture and shutter speed settings for your camera.
What is the best light meter for cinematography?
The best light meter for cinematography will depend on your specific needs and preferences. Some popular options include the Sekonic L-858D-U Speedmaster Light Meter, the Sekonic Litemaster Pro L-478D, and the Gossen Digipro F2.
How do you read a film camera light meter?
To read a film camera light meter, you need to look through the viewfinder and adjust the aperture and shutter speed settings until the meter needle is centered in the middle of the meter scale. This indicates that the exposure is correct.
Is a light meter important in film cameras?
Yes, a light meter is important in film cameras because it helps you determine the correct exposure settings for your film, which can greatly affect the final result of your photos.
What is the best light meter app for film photography?
Some popular light meter apps for film photography include Pocket Light Meter, Light Meter Free, and MyLightMeter Pro.
What is the best light meter for lighting design?
The best light meter for lighting design will depend on your specific needs and preferences. Some popular options include the Sekonic L-308X-U Flashmate Light Meter and the Gossen Digisky Flash and Ambient Light Meter.
What is an analog light meter?
An analog light meter is a type of light meter that uses a needle and dial to display the recommended exposure settings for your camera.
How do you read a light meter on a film camera?
To read a light meter on a film camera, you need to adjust the aperture and shutter speed settings until the meter needle is centered in the middle of the meter scale. This indicates that the exposure is correct.
What is a keks light meter?
Keks is a brand that makes analog light meters for photography.
What is a lux light meter?
A lux light meter is a type of light meter that measures the illuminance of light in lux units. It is often used for measuring light levels in indoor spaces.
What is a Sekonic L-308X-U Flashmate Light Meter?
The Sekonic L-308X-U Flashmate Light Meter is a popular digital light meter that is designed for photographers who use both ambient and flash lighting.
What is a Gossen Digisky Flash and Ambient Light Meter?
The Gossen Digisky Flash and Ambient Light Meter is a popular digital light meter that is designed for photographers who use both ambient and flash lighting. It can measure both incident and reflected light.
If you enjoyed reading this article, you can as well check out our other filmmaking-related articles here!
